Themes: Creating, using, and sharing
This document is a complete journey through creating and developing themes, deploying them on your website, and, if you are so inclined, sharing them with the Textpattern community. Furthermore, it’s all in context of default installation conditions, though easy to follow along with regardless. The only thing you will not learn here is how to use Textpattern tags, HTML, CSS, and the like; in other words, the fundamental composition of your theme assets.
Contents
- The big picture
- Default theme
- Development themes preference
- With-selected controls
- Add a new website section
- Development environment set up
- Theme assets development
- Deploy development to live
- Building a new website with multiple themes
- ‘Database’ themes versus ‘disk’ themes
- Exporting themes
- Community themes
- Deleting themes
The big picture
Textpattern users, and theme designers in general, new and old, will find Textpattern theming exciting. Being that Textpattern is unlike any other content management system, so is the theming functionality and workflow it provides. Before diving in with how to do things, which you’ll have mastered by the end of this document, consider it all from higher up the ladder.
A theme development ‘studio’
The addition of the Themes panel has essentially transformed how to think about building website architectures with Textpattern’s semantic building blocks. Textpattern designers will likely find the Themes panel is now the centre stage of the administration side. Indeed, the back-end is like a theme development studio, where you can work on many themes simultaneously, for employing on your website or sharing with the community. But don’t worry, writers and editors, Textpattern is still the same system to do what its creator envisioned, just write.
Theoretically speaking, you could hack a theme package together, from scratch and by hand, directly on your web server. The metadata is simple, and the files are text-based .txp format and familiar .css. And, sure, it can be a learning experience to sit on the cold garage floor with grease and gears.
This document, however, describes the sensible approach of using the new theming functionality in the back-end to ensure everything is organized and aligned correctly. Be at ease knowing that creating a new theme has no impact on a website’s operation or presentation if the pages and styles of the theme are not yet associated to the website’s functioning sections (easy to tell at a glance, as you will see). If not, you can freely modify the assets of any theme without worry.
Default system references
In addition to the document you are reading, and your own installation of the software, the following resources make for handy references to default system conditions in case you go astray, or in the event you do not have an installation of your own yet, in fact. Make note of these:
- Front-end demo of default theme:
- Current stable release of theme
- Upcoming release of theme (in development)
- Back-end demo of fresh software install (first copy the username/password detail, then proceed to the ‘Admin’ version of choice)
- Package assets: pages, forms, styles, metadata (go to dist/{name-of-them})
The front-end and back-end demos are routinely updated. The back-end demo offers a choice between the current version release and the next one under development.
Author prefix and registration
If you intend to create themes to share with the community, you must register and use an author prefix. Your chosen prefix must not already be taken, as indicated by the prefix lists. Having and using a personal prefix ensures no two themes will ever be created with the same name, thus tripping Textpattern up.
While prefixes are the same whether you create themes or develop plugins, the naming convention is different in each case to make it clear at a glance what product a name is representing. Basically, theme names use hyphens, and plugin names use underscores. If your prefix is abc, for example, your theme names would look like this:
- abc-theme-name
And your plugin names, if you developed any, would look like this, as always:
- abc_plugin_name
Theme package
A Textpattern theme is a collection of page templates, form markup, stylesheets, and a manifest file with a little metadata; all packaged together in a single directory bearing the theme’s name. The single directory can be thought of as a ‘package’ and its contents can be thought of as ‘assets’ organized in subdirectories by type.
To ensure a theme imported into your installation does not break your front-end, Textpattern augments imported themes with any missing assets needed by the default system, and provides empty placeholders where non-essential assets are missing. This is useful, say, when the grease-monkeys build from scratch and the integrity of a given theme’s structure is questionable.
Following is the expanded tree of a default package structure:
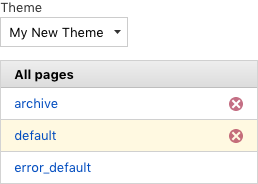
- abc-my-theme-name
- pages
- archive.txp
- default.txp
- error_default.txp
- forms
- article
- article_listing.txp
- default.txp
- search_results.txp
- category (empty)
- comment
- comments.txp
- comments_display.txp
- comment_form.txp
- file
- files.txp
- link
- plainlinks.txp
- misc (empty)
- section (empty)
- article
- styles
- default.css
- manifest.json
- pages
Of the entire package, only two page templates and the metadata file are ‘essential’:
- abc-my-theme-name
- . . .
- . . .
- default.txp
- error_default.txp
- . . .
- manifest.json
- . . .
Theme designers would doubtfully ever share such a worthless theme, but if one did, and you actually wanted to use it, here’s how Textpattern would treat it at time of importing:
- Pages. If the essential page templates were missing, they would be created as empty pages. If the entire /pages directory was missing, it would be created, as well the two essential pages with their default contents.
- Forms. If non-essential form files are missing, they are added in place as empty files. If any form subdirectories are missing, or the entire /forms directory, the full /forms directory from the tree above will be created, and the eight form files will contain default Textpattern markup.
- Styles. If the file is missing, it is added as an empty file. If the /styles directory is missing, the directory plus a blank default.css file will be created.
- Metadata. The metadata file is handled more simply; the focus is on any missing metadata values.
Textpattern will always augment a theme this way when importing or updating one, and any of the default package assets are missing. If, after importing or updating such a sparse theme, you later delete any of the augmented files, and that’s your prerogative, and exported it that way for sharing, those files will remain missing in the exported theme. In other words, you would be sharing a worthless theme, just like the one shared with you. But that’s fine, because it would not break anything when someone else imported it at their end. Their installation of Textpattern would augment the theme with defaults and placeholders again just like described.
In the event you are new to Textpattern, a brief recap of what assets are might be useful.
Page assets
Pages are your web page templates, primarily built with HTML and Textpattern tags. Pages may be constructed solely with embedded markup, or by interchanging markup with form ‘includes’ (using output_form tags), or as a combination of embedded markup and form includes. Pages are assigned to one or more of your website’s sections. A one-to-many relationship between pages and sections, achieved with forms and conditional tag logic, can result in a site architecture that’s easier to manage and maintain. Definitely learn Textpattern tags!
Form assets
Forms are the named containers of markup components (conceptually the same as partials, snippets, or includes) for inclusion into page templates, or for nesting into other forms. Such ‘Russian doll’ construction of your website’s architecture using pages and forms enables building sophisticated website structures that are, again, easier to manage and maintain.
All form files must have unique names — across core forms and any custom forms created — and core form names will never be changed from their defaults. Compound form names use underscores between words (e.g. custom_form_name) and the resulting template file name should match (i.e. custom_form_name.txp).
Style assets
Of course, you know what stylesheets are. Styles need no further explanation except to emphasize that, like pages, they must be associated to one or more sections of your website in order to rule the presentation of them.
Metadata
The essential metadata rides with the package as a manifest.json file, in which the following six metadata items are found:
- title
- version
- description
- author
- author_uri
- txp-type
The first five items reflect data pulled from the theme editor, which is accessed via the New theme button, or via an existing theme’s name in the themes tables.
The title is always required by Textpattern, but it’s not a required field in the form editor when creating a theme. If you don’t provide a custom title, Textpattern will generate one based on the required theme name (explained more later in the Create from scratch section). Either way, a title will always be present in a manifest file, but it is better if you create a custom value rather than rely on Textpattern to generate one for you.
The txp-type and its associated value is a constant; it must always exist and never change.
The remaining four items reflect more optional metadata fields, which nevertheless should be filled in when the data is known. If skipped, Textpattern will provide default values for the version and author items at time of theme creation; so these values will pass with an imported theme if not changed by the author. The description and author_uri (i.e. the Website field in the theme editor) items are treated as none values in metadata.
Altogether, a minimum-filled set of metadata for a theme would look like follows, where ‘username’ would be the theme author’s log in username for their Textpattern installation:
{
"title": "My New Theme",
  "version": "0.0.1",
  "description": "none",
  "author": "username",
  "author_uri": "none",
  "txp-type": "textpattern-theme"
  }
Scope of possibilities
Textpattern has always allowed you to create a different presentation for your website by merely editing the default stylesheet, or using one or more static files on your web server. But with the inclusion of themes functionality, you can make and collect many theme packages that can be:
- Swapped in and out on your entire website
- Used to create different presentations; one for each site section
- Used to create different site structures, to a certain degree
- Shared with the community, so others can benefit from your savvy design sense.
And that’s it for the big picture. Now we descend the ladder and get closer to the action! Everything from here on is framed in context of a fresh (out-of-the-box) install of the software, but the principles are the same whether your installation is brand new or an old workhorse that’s up to date. As long as you are using the latest release of the software, at least, it will make sense. Any exceptions to this rule are made clear in context of instructions.
Default theme
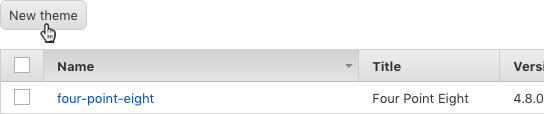
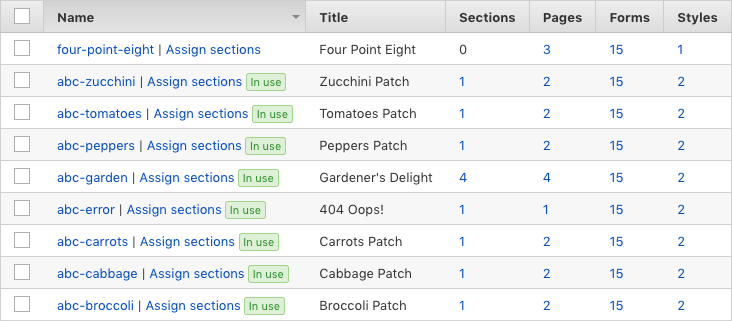
When looking at the Themes panel of a new installation of Textpattern, a single theme named ‘four-point-eight’ appears in the display table.

When clicking the theme’s name, the Edit theme form opens up showing you the default theme’s metadata properties. See the Create from scratch section for more about these fields.
Although there is no indication at this initial default state, the ‘four-point-eight’ theme is live on your site by fact it is the only existing theme.
When one or more other themes exist, two more elements appear next to the default theme’s name:
- an ‘Assign sections’ link
- an ‘In use’ pill indicator making it clear the theme is live on the front end.

To establish one or more additional themes, you either need to create them, discussed in the next sections, or import them from an external source.
Development themes preference
A single, important preference is associated with themes development. It is located at Admin > Preferences > Admin, second preference from bottom of screen: Enable development theme preview?.
As the help tip for that preference says, when this is active, and it is by default, users with sufficient privileges [initially Publisher and Designer roles] can safely develop and preview a new theme while all other users will still see the old theme (until the new one is deployed).
Presumably you are reading this because you want to develop and preview new themes, so make ensure the preference is set to ‘Yes’. The rest of this documentation assumes this setting.
See more about the active behaviour of this preference in the Preview theme presentation section.
With-selected controls
The with-selected controls are a long-time and important functionality in Textpattern. Users of Textpattern are familiar with these; a combination of checkboxes on table records that work in relation to a selection menu where options can be selected and applied to checked items.
Several new selection options are available for Themes functionality between the Themes and Sections panels. Each is described in other sections of this document in context of use.
Themes panel selection options:
Sections panel selection options:
Add a new website section
If you need to create or edit website sections before setting up a development project, now is a good time. Do this in the Sections panel, as normal.
To create a new section, use the New section button to open the section editor and create one from scratch.
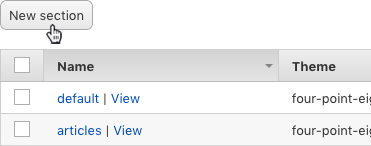
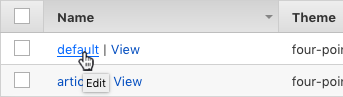
To edit an existing section, click a section’s name under the Name column of the sections table.
In both cases, the section editor will open. The theme assignment made in the section editor will apply as the live theme assignment, even if you assign what is otherwise a development theme.
Be aware of that. If you do not want the assets of an intended development theme to be live, do not assign a development theme in this location. Use the ‘Change theme/page/style’ controls instead when working in development environments.
Development environment set up
Development set up means walking through a series of actions to establish a working themes development environment. The birds-eye view of the development set up process is:
- Establish your starting theme package(s) with correct metadata, and get the asset files in place and properly named
- Assign one or more assets of the new theme package(s) to website sections
- Ensure everything is aligned as desired.
It’s important to understand that the first step above does not mean develop your themes to completion; on the contrary, it simply means establishing the initial theme package(s) and their expected asset placeholders (pages, styles, forms). At this point the assets can be blank files, duplicated markup from the default theme, or something else entirely, it doesn’t matter.
Once the above three steps are completed, you are ready to proceed with HTML and Textpattern tag development in pages and forms, and likewise with CSS in styles, but not before.
Creating theme packages
Multiple options are available for establishing new theme packages for development. You can:
- Use the New theme button to create from scratch
- Duplicate an existing theme via the ‘With selected’ menu’s ‘Duplicate’ option
- Duplicate a theme via the theme editor.
Whatever option you choose, you want to be smart and think ahead. Think about your final front-end presentation ambitions and how many different themes or assets that will require to achieve. Then pick the path that saves you the least amount of work to establish the initial development environment.
If you only ever need one theme, it probably doesn’t matter a lot which way to start. But if you expect to need multiple themes and a mix of assets across them for a wild website design, you might be better off duplicating an existing theme first. You would do this to get all of it’s existing assets in your package quickly. You could then add to those assets where anything you need is missing (or needing renamed). Then you could duplicate this newly augmented theme (having all page and style possibilities) as many times as necessary to get all the themes and all the assignment possibilities you need in your final development environment.
Once the environment is established as you like, you can go back and delete the obsolete assets from each respective theme in your project leaving just the assets used in each case.
It might be hard to understand now why this is helpful, but you will understand when first assigning theme assets to sections. It can save you a lot of needless jumping around in the back end later, creating assets on the fly and getting distracted from the task at hand.
Also see Different themes on different sections for more context on this useful notion.
Create from scratch
Creating a development theme from scratch is the most called-out way to get started, by evidence of the prominent New theme button at top of the Themes panel.
But it’s arguably not the best way to start since you would then have to create all the assets one-by-one as well. For that reason, we’ll jump to establishing theme packages by duplication, but if you want to create one by scratch, by all means do so.
Duplicate via selection controls
Using an existing theme package as a guide for your efforts is a good way to get started with making new themes. There’s no better package to use in this case than the default theme that comes with Textpattern, already shown and functioning in the Themes panel upon installing the software.
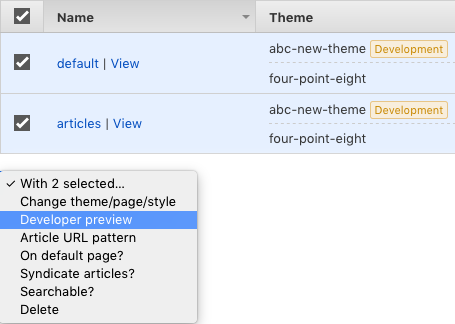
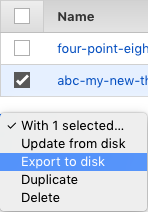
One way to duplicate a theme is via the ‘With selected controls’ on the Themes panel. Proceed by checking the box next to one or more themes (in this case the default theme is demonstrated), then select the ‘Duplicate’ option.

Click ‘OK’ when asked if you are sure.
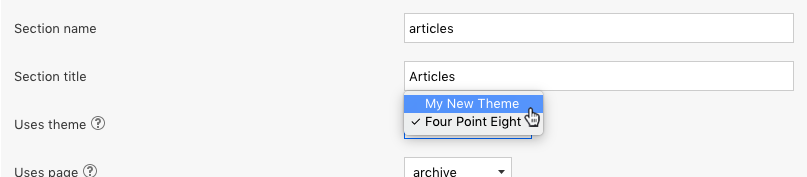
The duplicated theme is added to the themes table and the name appears with ‘_copy’ on it. You can now uncheck the default theme’s box in the table, then proceed with changing the name, title, and other metadata values on the duplicated theme. Do this by clicking the theme’s name in the Name column of the themes table to open the Edit theme editor.

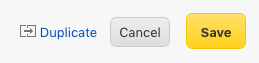
Change the metadata in the six fields as thoroughly as possible. If you don’t have a value to give for an optional field, clear the field’s value so it is entirely blank. You can always fill it in later. When finished with changing all the metadata on your duplicated theme, click the yellow Save button to save changes and close the form.
(The ‘Duplicate’ link you see in the image above is a hint to the next section. Do not click it now.)
The duplicated theme will be added to the themes table in the main panel view. Once the default theme is duplicated and the metadata changed, the duplicated theme is, for all practical purposes, a new theme that you will further development later.
Duplicate via theme editor
The other way to create a theme by duplication is the most direct yet least obvious way (fewer clicks in the interface).
Begin by clicking the name of the default theme under the Name column of the table (or using any existing theme) to bring up the Edit theme editor.
The editor will show the theme’s metadata as expected. Change all the metadata as described in the previous section. When done, click the ‘Duplicate’ link at bottom of the editor, at right of the Cancel button. Do not click the Save button or you will overwrite the metadata for the source theme!
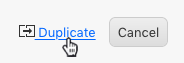
There is no confirmation dialogue asking if you are sure when clicking the ‘Duplicate’ link. You are simply taken back to the default panel view where your new theme is added to the themes table.

Assigning theme assets to sections
The mere existence of a new theme in the Themes panel does not mean it is already in a development or live state. They are in your database, yes, but just sitting their innocuous and unusable. You have to actually make a theme package usable, one way or the other, by first assigning one of its assets to an existing section using the ‘Change theme/page/style’ selection controls. You can do this by going directly to the Sections panel, or in context of a given theme package via the ‘Assign sections’ link.
‘Assign sections’ link
Immediately after a theme’s name in the themes table of the Themes panel, is a link, ‘Assign sections’.

Click this link and you are whisked off to the Sections panel in context of the theme to assign one or more of it assets to one or more existing sections.
‘Change theme/page/style’ controls
Only one development theme can be applied to a given section at a time, but any number of themes can be applied to different sections in one-to-one relationships.
If you arrive to the Sections panel by way of the ‘Assign sections’ link, you’ll see all the sections checked and the ‘Change theme/page/style’ controls open under the table with the theme you followed selected by default.

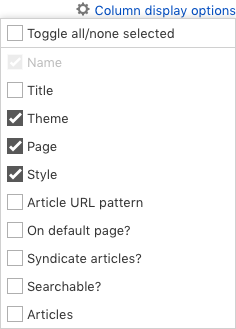
Note the image above is showing a Sections panel table with several irrelevant columns turned off for simplicity, just so you understand.
Arriving to the Sections panel via the ‘Assign sections’ link is not necessary; it just offers you a convenient way to get the controls open and in context quickly. You could just as well arrive to the Sections panel via the main navigation and pull up the menu option on your own.
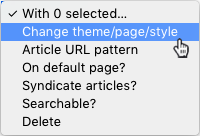
The option reveals a few associated boxes and menus when clicked. The first of these are the ‘Development’ and ‘Live’ environment checkboxes.

To assign a theme’s assets as development, check the ‘Development’ checkbox only. If you select both boxes, or only the ‘Live’ box, the theme’s asset(s) assignment will become live, which is premature at this point.
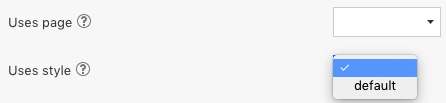
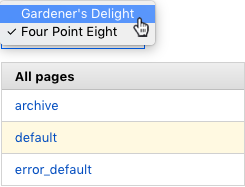
The next control is the Theme selection menu to indicate which theme should be applied. Note that it uses the theme’s title, not its name.

Again, if you arrived to the Sections panel via the aforementioned ‘Assign sections’ link, the theme for the link you clicked will appear automatically in context of the themes selection menu.
The last menus are for selecting the page and style assets in context of the indicated theme, so you need to ensure the theme selection is correct first, regardless of how you arrived to the Sections panel. The page and style assets you select are what get assigned to the section(s) that are checked.

Be careful about making assets assignments to sections if you arrived to the Sections panel via the ‘Assign sections’ link. The sections table will show all sections checked by default, both ‘Development’ and ‘Live’ checkbox controls will be checked, and the themes selection control will display the theme you chose. Here is that image again…
As already mentioned, you do not want to use the ‘Live’ checkbox option at this point unless you know the theme’s assets are ready to appear live on the front end. We assume here they are not.
You probably do not want to check all sections either, as explained next.
Templates-to-Sections relationships
If you go through with assigning a page and style with all section records checked, as will be the case if following the ‘Assign sections’ link, every section will have the same page and style assignment. This might be fine for the style assignment, if you use a single stylesheet for your entire website, but it probably won’t be what you want for your page assignments, depending on how you have your page templates designed.
The assumption made for having all sections in the table checked by default, when following the ‘Assign sections’ link, is that the majority of sections, if not all, use a common page and style for everything. The page is assumed to be constructed with conditional logic such that regardless of what section it is assigned to, it will output the necessary content as expected. This is what’s known as a one-to-many page assignment to sections. By contrast, a one-to-one assignment is where multiple or all sections have a unique page template. The same idea applies to stylesheet assignments.
Realistic website architecture:
It’s actually rare that anyone uses a single page template for the entire website, though it can be done, and especially for simple sites like blogs. The more complex your website’s structure, the more difficult it becomes to create single-template architecture. The markup on such a page would be filled with nested conditional tag logic and might be more headache than helpful when trying to edit them.
More typically, and even for smaller websites, is a construction like follows, but this is only one of any number of possibilities:
- A unique ‘default’ page template for the default (homepage) section, assuming your homepage design is quite different from the rest of the regular website sections
- A dynamic ‘articles’ page template (or whatever you want to name it) for all the sections concerning dynamic articles publishing
- A ‘common’ or ‘generic’ page template for all the evergreen (i.e. static) sections (e.g. About, Policies, Colophon, or what have you)
- A ‘contact’ template, perhaps, for a contact form page, if not folded into the ‘common’ template
- An ‘error’ page template to create custom 404 error designs
In such a construction, the default homepage, contact form page, and error page pairings to sections are known as one-to-one page to section assignments, while the dynamic articles and common templates used against multiple sections reflect a one-to-many page to sections assignment.
Stylesheets generally have more of a one-to-many assignment because people often use a single stylesheet for the whole website; either by keeping all CSS rules in the same sheet, or by appending the rules of multiple sheets to one using the @import rule. But this is not always the case, and certainly not a requirement. You might choose to use multiple stylesheet assignments in the same way you do pages, or altogether different, and especially if using a different theme on each website section.
It makes no difference how you match pages and styles with sections, whether one-to-one, one-to-many, or a combination of both, as the example structure above suggests. Just be aware that when arriving to the Sections panel via the ‘Assign sections’ link, you’ll probably have to do a lot of unchecking and checking of section records as you run through using the ‘Change theme/page/style’ selection controls. Textpattern will not know how you have your templates and stylesheets designed, so if they are assigned wrong, your front end presentation will break.
Status indicators
We assume at this point that you have now established all your needed themes and assigned their assets to sections accordingly. You may not have it all right yet, but before proceeding with doing more, consider the important indicators in themes functionality that are available to you. Indicators inform you of a given theme’s status, or the overall composition of a development project. These indicators are quickly introduced here, but you’ll see them come up in the images of other sections in context of workflow descriptions.
Package assets indication
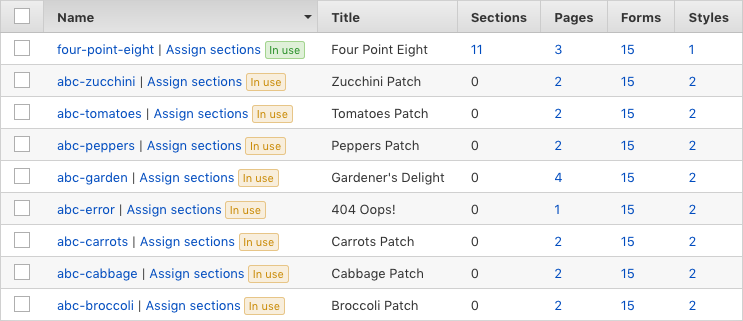
Under the Pages, Forms, and Styles columns of the themes table in the Themes panel are linked numbers indicating how many assets of each type are associated to a given theme; in other words, the theme packages contents (metadata excluded).
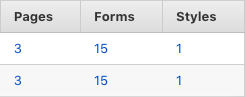
When you duplicate the default theme (as the next image depicts), or any other theme, the existing assets in the source theme are cloned as well, logically, thus why the duplicated themes have the same number.
These numbers can change between themes, of course, as you add or remove assets in a given theme.
Click any of these numbered links and you are taken to the respective panels with the indicated number of assets in context. For example, clicking a ‘3’ under the Pages column for the duplicated theme lands you on the Pages panel with the associated three pages listed:
You can tell which theme the panel assets are in context with by the appearance of the Theme selection menu above the assets list showing the title of the relevant theme. (The Theme selection menu does not appear in assets panels when the Themes panel only has one theme.)

The Theme selection menu can be used to change theme context from any assets panel.
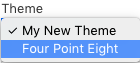
You remain in that different theme context as you browse around the back end. Switch theme context again at any time from any assets panel by using the Theme menu again, or by returning to the Themes panel and clicking a number link for a different theme’s assets.
Associated sections indication
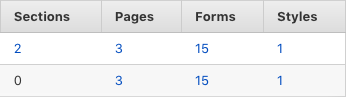
In addition to the assets columns in the Themes panel is the Sections column, showing how many sections are associated to the theme.
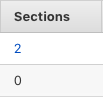
Any theme with ‘0’ section associations is not in use, whether in development or live.
‘In use’ pill indication
‘In use’ pill indicators appear on the Themes panel. They make it clear when a given theme is either live (green) or in development (orange).

There will always be a least one theme functioning as the live theme. When the live theme equals the only theme in the Themes panel table, the green ‘In use’ pill is hidden, since showing it would be needlessly redundant.
At all other times, when there are two or more themes in the Themes panel, at least one of those themes will appear with the green pill.
It’s possible to see multiple green and orange pills in the Themes panel at a given time, depending on how you design your website and what you are in the middle of developing.
‘Development’ pill indication
Orange ‘Development’ pill indicators appear in the Sections panel next to a theme’s name after you assign the assets of a non-live theme to the section.

As the image shows, the name of the newly assigned development theme appears above the name of the working live theme, separated by a dashed line. This means to suggest the working development environment on top of the live status.
Also, there’s only one page and style asset name in each case. This indicates that the names of the development assets assigned to the section have the same names as the live theme’s assets on the same section. In these situations, the common name is shown once by itself to not overload the table cell unnecessarily.
Different asset names indication
In contrast to assigning assets with common names, as just explained above, you could also assign assets having different names, whether for a new development theme or an existing live theme.
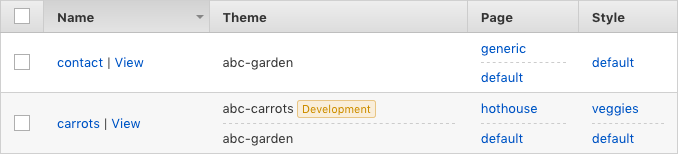
As with the appearance of different theme names, the differently assigned asset names also appear above the asset names working live on the front end, separated by dashed lines. If both a new development theme and a differently-named asset are assigned, they will appear aligned across columns by their positions above the dashed lines.
A theme name with no ‘Development’ pill indication is the theme working live on that section. If a differently named asset in that theme package is assigned for the section, the newly assigned asset is not yet live; it’s in development status even though no ‘Development’ pill appears on it.
‘Missing’ pill indication
If you ever see an asset name flagged with a red ‘Missing’ pill, it is a warning telling you that the asset has been deleted, or is otherwise missing in the theme package.

If you tried to view the presentation of this section with the missing page, you would get the 404 error page instead. If you deployed a development theme to live status when an assigned asset was missing, your front-end presentation would break.
There are options for dealing with a situation like this. The most direct and intuitive fix is to click the name of the missing asset. This puts you in direct context of a new template (whether page or style) with the missing asset’s name added. Simply save the template, even if empty, and the ‘Missing’ warning will go away. Don’t forget to fill in the template, though, because an empty one is little better than none at all.
Alternatively, you could assign a different page template to the section. The alternate template must already exist, of course, so if not, use the solution described above. If an alternate does exist, assign it using the ‘Change theme/page/style’ controls.
You can use the links under the Page and Style columns to directly access and work on the assigned template at the other end, then return to the Sections panel context to view how the presentation is shaping up.
Theme assets development
(forthcoming, very surface-level)
Page templates
(forthcoming, something light)
Stylesheets
(forthcoming, something light)
Form snippets
(forthcoming, something light)
View theme presentation
Once you have the development environment set up, you can easily view your development progress on pages, styles, and forms by following the ‘View’ link next to a given section’s name.

This will open that section’s front end view, but showing you the development assets, not the those that are live.
As long as the development themes preference is set to ‘Yes’ (and a user is logged in with the appropriate rights), the presented view will always be the development theme view, no matter how you access the front end from the administration side.
If the development themes preference is on, but you want to quickly see the live presentation of your site, you must either turn the preference off, or use your browser’s private browsing (incognito) mode to simulate being logged out.
Deploy development to live
Two options are available to you to apply one or more development themes to live status. You can use the ‘Change theme/page/style’ controls already covered, making sure to use the ‘Live’ checkbox option this time instead of the ‘Development’ checkbox. Or you can do it easier with the ‘Developer preview’ controls.
‘Deploy to live’ option
The ‘Deploy to live’ option only appears in the selection menu when you already have one or more development theme assets assigned to sections.
The assumption for this behaviour is you do have a development project set up, completed, verified, and ready for launch.

And that’s the main value of this menu option: deploying all at once. Unlike the ‘Change theme/page/style’ controls, where you work with one theme per section at a time (barring the rare situation you use a single theme, page, and style for your entire website), the ‘Deploy to live’ will convert all of your development to live at once.
The other radio button, ‘Reset to live’, offers you a way to undo, in bulk, all of your development theme assignments across sections; basically erasing your entire development environment, converting the Sections panel back to its original live theme state.

This does not delete themes or undo any development on theme assets, it simply clears the development assignments in the Sections panel, putting it back to its default, live condition.
It is best to ensure your whole development project is ready to go, otherwise the ‘Developer preview’ controls are, perhaps, overkill. If you are just working with one or two sections, the ‘Change theme/page/style’ controls with the ‘Live’ checkbox option would do just as well. Options are available to you. Do it as you please.
Building a new website with multiple themes
Here is a hypothetical website development project that walks through building a Textpattern website — from default installation to launch of final presentation — and covers everything learned in this document so far, and then some.
The workflow from a fresh installation of the software is:
- Plan and map the new architecture and theme associations
- Create the needed website sections
- Establish the working themes and assets
- Assign theme assets to sections
- Develop theme assets to completion
- Launch development to live
We assume in this example of project development that the Textpattern installation is on a local development server. But it does not matter, even if you are working on a production server, because the website architecture expansion and themes development described here is not visible to the public anyway until the development work is launched live. So don’t worry about whether or not you can setup a local development server. It’s a good idea for other reasons, but not required here.
Plan and map the desired structure and theme packages
Diving into a development project without any plan is never a good idea. Hopefully that does not need elaborated. The more you plan, the more efficiently you work. But it does not take a lot to make significant gains in this case.
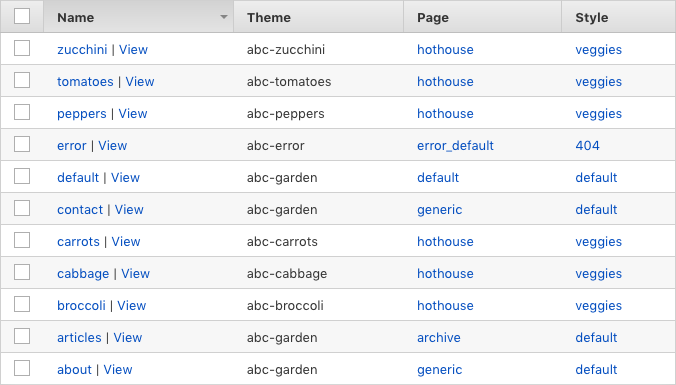
Say we have a gardener’s website, The Gardener’s Delight, and the owner wants a different vegetable theme on each of the website’s six main vegetable sections, plus a general theme on the homepage and auxiliary pages, and a clever 404 error page having its own dashing design.
This could be structured in any number of ways, but Table 1 shows one possible blueprint for this mapping, which is neither too exaggerated nor ideally concise.
| Section | Theme* | Page | Style | |
|---|---|---|---|---|
| 1 | default† | abc-garden | default | default |
| 2 | articles | abc-garden | archive | default |
| 3 | about | abc-garden | generic | default |
| 4 | contact | abc-garden | generic | default |
| 5 | error | abc-error | error_default | 404 |
| 6 | broccoli | abc-broccoli | hothouse | veggies |
| 7 | cabbage | abc-cabbage | hothouse | veggies |
| 8 | carrots | abc-carrots | hothouse | veggies |
| 9 | peppers | abc-peppers | hothouse | veggies |
| 11 | tomatoes | abc-tomatoes | hothouse | veggies |
| 11 | zucchini | abc-zucchini | hothouse | veggies |
|
||||
For clarity, here are the counts and types of theme asset pairings to sections reflected in Table 1:
- three one-to-one page pairings to sections: default (1), archive (1), error_default (1)
- two one-to-many page pairings to sections: generic (2), hothouse (6)
- one one-to-one style pairing to a section: 404 (1)
- two one-to-many style pairings to sections: default (4), veggies (6).
The map allows setting up a Textpattern website structure and theme development environment with purpose. With the map at hand, we can use what has already been learned in earlier sections of this document. And if we proceed in a particular order, a lot of jumping around in the back end can be eliminated.
Create the needed sections
First thing to be done is create the sections you mapped in your blueprints table that do not already exist. Only create sections that are missing from your blueprints, and do not edit or delete any sections that already exist. Existing sections apply to Textpattern’s default theme. Either use sections that exist as they are, or create new ones.
In this case, we use the two existing default sections: ‘default’ and ‘articles’ (rows 1 and 2 in Table 1). Nothing to do there yet. Now the remaining nine sections need created.
For each one, click the New section button. Add the name and title of the section, leave the default theme selected (four-point-eight), and select the blank option for the page and style so no page or style is selected.
Save the new section and repeat the process for the remaining sections needed. Don’t worry about the other section editor form fields and controls yet when creating the sections. You can edit those any time later after the development environment is initially setup. Right now we just want to get the sections in place quickly,
When all needed sections for the Gardner’s Delight website were created, our Sections panel looked like this:
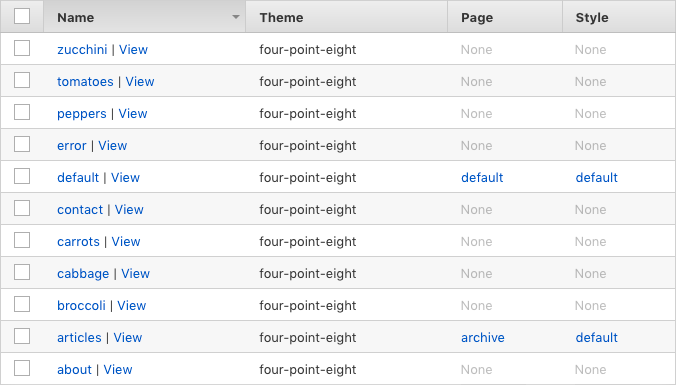
It’s easy to see the new sections from the defaults, as they don’t have any page or style assignments yet (only ‘None’ appears). We could have easily used any other page or style options in the section editor menus, because we are going to re-assign development assets to those file locations anyway. But the blank options are a nice way to get started with new sections because the ‘None’ values stand out easy in the sections table, making it easier to see what asset assignments are needed.
Establish all needed theme packages
This does not mean develop your themes to completion. All you want to do at this point is establish the correctly named packages and ensure the component assets, especially the pages and styles (forms can come later), are in place with correctly named placeholders.
Start by duplicating the default Textpattern theme. You don’t want to edit the default theme. We’ll clone its assets, leave it live, and forget about it.
Now we have our first theme package, abc-garden. The structure blueprints say we need seven more themes: one for each of the vegetable sections and one for the fancy error page. We’ll use the new abc-garden them as the new theme to duplicate.
But here is the important key, as originally mentioned in Creating theme packages! Make sure all possible page and style assets you anticipate needing across all other needed themes are created for the source theme first, even if not needed in a given theme later. Since you’re using this original theme to quickly establish the other themes you need, you want these assets to travel in the duplication process; otherwise, you’ll have to manually create each asset per theme before you can assign the assets to sections in a development environment, a lot of needless hopping around. It’s not a big deal if you forget and have to do that, but why get waylaid with tedious repetition.
This is why creating a blueprint map of your structure is useful (Table 1). All your anticipated theme, page, and style needs and names are then clear. In this case we need to create two more pages (‘generic’ and ‘hothouse’) and two more styles (‘veggies’ and ‘404’) in the abc-garden theme so they duplicate with the theme. We do this in the Pages and Styles panel in context of the abc-garden theme. Here we start with the Pages panel and change context.
When creating your pages and styles, you can either duplicate and rename existing templates, as implied here.

Or just create new, blank files. The asset creation and duplication controls are immediately available in asset panels, in context.
Again, theme asset files do not have to be developed to function properly yet, they only need to exist as placeholders with the correct names you want. They can be empty, filled with lorem ipsum, or any manner of markup; it doesn’t matter. All you’re doing at this point is getting the development environment pieces in place to be assigned and aligned together in the least laborious way possible. Once it is all properly assembled and assigned, then you will go back and actually work with HTML, Textpattern tags, CSS, and whatever else you desire to fold into your website’s final behaviour and presentation. This work is still ahead.
About forms:
Yes, forms will need developed too, but it’s hard, admittedly, to anticipate what forms you will need this early. For purposes here, we let the original default forms travel in the themes duplication process. As you become more experienced with Textpattern you might be able to add forms to your blueprints, but even veteran users of Textpattern will create forms on the fly, so don’t worry about forms too much at this point. Just consider forms part of your actual development process.
Assemble the development environment
Now it is time to assign theme assets to sections using the ‘Change theme/page/style’ controls, and according to the structural blueprints, again (Table 1).
This is where you will appreciate having duplicated the original and subsequent themes in such a way that each contains the necessary range of asset options, thereby avoiding having to abandon the assigning process now to go and create them one by one when you realize a given theme doesn’t have the asset you need. You can’t create them on the fly using the ‘Change theme/page/style’ controls.
Once the desired assets of each theme are aligned with sections correctly, we have the following development setup for our Gardener’s Delight website.
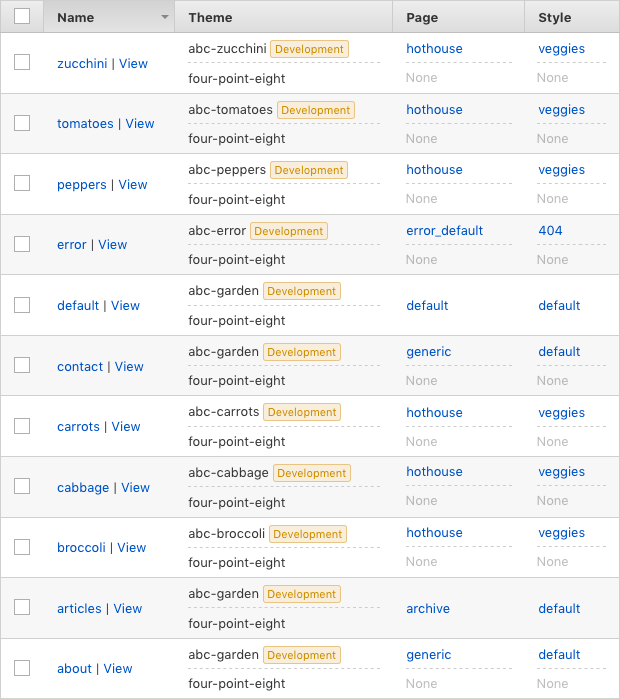
Note that our assigned assets on the new sections are now sitting over the initial ‘None’ values in the grid. That’s expected in this case. The sections are new; not used in the default theme. If we had used the default assets in section creation instead of the blanks, we’d be seeing all the ‘None’ values filled with ‘default’ instead, and it would not make a difference.
Also note that because we assigned abc-garden assets to the two existing sections (the Textpattern defaults) having the same asset names, there’s no dashed line division to indicate differently named assets. But by evidence of the ‘Development’ pill in the Theme column, we know there is a different theme assigned on those sections regardless.
If you peeked into the Themes panel at this point, all of the themes would have an orange ‘In use’ pill by their names, except where the software’s default Four Point Eight theme was still functioning.
Once you have the desired assets assigned to sections per theme, thereby setting up your functional development environment, go back to a given theme’s assets, particularly the pages and styles at this point, and delete the non-assigned items to keep things tight and tidy. For pages and styles this means clicking the red check icon next to the obsolete templates.
HTML, CSS, Textpattern tags, etc.
Now the development environment is setup. At this point in your workflow, you have effectively established your development previewing location. In other words, the Sections panel serves as the place where you can easily see and assess themes in development and their assets to sections assignments. Combined with features on the Themes panel, and the various indicators and links between the two panels, you have a complete development system that makes it easy to get to any theme’s assigned asset files.
In the Themes panel, your package assets are accessible via their numbered indicators, under the Pages, Styles, and Forms columns (page and style counts are adjusted here, but no attention was given to forms).

Likewise, in the Sections panel, you have direct links to the individually named pages and styles. Click these links and the asset files open in the editor ready to be modified.

If it is easier for you to empty out your asset files and start from blank screens (assuming you originally duplicated them instead of creating them new), do it. Or, if you are comfortable refactoring markup already in a duplicated asset, great. Copying and pasting… It’s all good. Whatever way you like or prefer doing it, now is the time to actually develop your templates, CSS, and Textpattern tag logic. The files are created and aligned in your architecture, you just have to make them functional and pretty.
Unlike pages and styles so far, Textpattern form needs are harder to anticipate in advance. But it’s no big deal to create and delete these along the way; after all, most are just snippets of market anyway, and that’s what you are developing at this point.
Previewing your development composition is not to be confused with viewing the presentation of your themes in development, which is done by clicking the ‘View’ links next to a given section’s name. As your mad creativity unleashes, periodically ‘View’ links to see how the presentation is shaping up on the front end.
In fact, as long as the development themes preference is active, you’ll see the development environment on the front end no matter what front-side link you follow from the administration side (e.g. the homepage link via the back-end navigation bar). It’s voodoo!
‘Deploy’ or ‘Reset’ to live
You have arrived. Your glorious new website presentation is tweaked to perfection, ready to launch, and Climate disaster has been avoided to make it worthwhile. You can now do exactly that: launch all of your development to live with one pass of the ‘Deploy to live’ option in the With selected… menu. The option only appears when one or more development assets have been assigned to sections in the Sections panel.
- Check every section in the sections table (e.g. use the ‘Toggle all’ box in top-left corner). If any sections have not been assigned development assets, they can be checked or unchecked; it makes no difference since nothing will change on them anyway
- Select the ‘Deploy to live’ option from the selection menu
- Click the Go button, and confirm when asked if you are sure.
All the development themes turn to live, assets too, and no more orange ‘Development’ pills remain visible.
If this were an actual project, all the orange ‘In use’ pills in the Themes panel table would turn to green pills, indicating their new live status, and the former live theme would become derelict (neither live or in development).
Alternatively:
If for any reason along the way in development you decide to scratch your development assignments to start over (instead of deploying them), you can easily do this all at once, too, but this time using the ‘Reset to live’ option:
- Check every section in the sections table as before
- Select the ‘Reset to live’ option from the selection menu
- Click the Go button, and confirm when asked if you are sure.
Again, this option only appears in the selection menu if you have one or more development assets assigned to a section.
The sections table will return to the original state it was in when you first created the new sections.
You have now learned everything there is to know about creating, developing, and deploying themes on your own website. We now turn attention to the functionalities for sharing themes in the community.
‘Database’ themes versus ‘disk’ themes
In relation to the remaining topics of sharing and using community themes, a clarification needs made about the difference between ‘database’ themes and ‘disk’ themes. This may be obviousness to some people. Others might appreciate the explanation.
Textpattern interface strings, pophelp, and this documentation in relation — and probably even developers themselves, and you, too, after reading this — will occasionally use terms that refer to themes as either ‘database’ or ‘disk’. These distinguishing terms reflect theme packages at specific locations in the aforementioned processes.
As far as the location terminology goes:
- Themes panel = database theme. When a theme is in the themes table of the Themes panel, it is in the database and thus can (and will at times) be referred to as a ‘database theme’.
- /themes directory = disk theme. When the theme package is sitting in the /themes directory, it is on the web server’s disk and thus referred to as a ‘disk theme’, ‘disk-based’ theme, or what have you.
When a theme is in both locations, as may often be the case in your workflows, remember to distinguish between them. The outbound and inbound shuffling of themes involves making choices about how to treat database and disk themes in the process.
It all centres around the /themes directory located in your software’s root location. The directory can be thought of as a checkpoint for incoming (imported) and outgoing (exported) themes:
- {root}
- files
- . . .
- themes
- . . .
- index.php
- . . .
With that out of the way, the remaining sections will make more sense.
Exporting themes
You have learned how to create and manage themes at this point, so take it to the next logical step and export one for other people to use. Fame and fortune awaits!
When your theme is tweaked to perfection and ready to be shared:
- Go to the Themes panel
- Check the theme’s box in the table
- Use the multi-selection controls to select ‘Export to disk’ (i.e. to the /themes directory).
The selection will trigger another option to respond to by way of a checkbox: ‘Delete unused templates from disk on export’.

If you read the help tip for that option, it says:
If checked, each template file in the selected theme(s) that does not have a corresponding item in the database will be permanently deleted from the disk-based theme. The result after completion of the action will be that your file system templates will reflect exactly what is in the database.
In other words, Textpattern is making a comparison between the theme package you want to export from the Themes panel, presumably the package designed as it should be, and any similarly named theme that might be sitting in the /themes directory but not so well put together. So it’s asking, if there is such a theme there in the directory, and any asset files in it do not have similarly named files in the panel version (the one you are exporting), do you want those files deleted as part of the exportation action?
This is generally a good idea, and the check box is ticked by default to make that clear. This ensures that after exportation, there is a direct match between the database version (in the Themes panel) and the version on disk (in the /themes directory).
Click the ‘Go’ button and confirm when asked if you are sure.
Now you are almost famous, but not quite yet. Still one more thing to do if you want your theme added to the new Themes website repository, coming soon. Zip it up! Textpattern will only host one file per theme package, and it must be compressed. So transfer the exported theme from the /themes directory to an external location and make it a single, compressed .gzip or .zip file.
Where you store the theme file for others to access is up to you. But whatever the location, whether Themes website or your own, make sure the expected URL has been entered in the Theme website field of the theme’s metadata. Add that by clicking the name of the theme in the themes table to pull up the theme editor.
Community themes
(forthcoming intro)
Importing themes
Unlike with exporting themes that you create, where the theme is already tabled in the Themes panel, importing requires first getting an externally sourced theme into the database. The /themes directory to the rescue, again.
First, use your (S)FTP software of choice to transfer the external theme (presumably downloaded from a shared location) to your /themes directory on the server. A theme import control will appear in the Themes panel, above the themes table.

If you had not seen that menu before, it is because it works in context with the /themes directory, as follows:
- One or more disk themes with no database equivalents. When one or more themes reside in the themes directory that are not in the database (i.e. in the themes table), the selection menu appears above the themes table with those themes listed, enabling their importation into the database. The menu is not visible if this condition is false.
- Disk themes match database themes. When the same themes are equally represented in the database and on disk, or only in the database and not on disk, the contextual menu is hidden, since there is nothing unique to import.
- Database theme deleted. If/when you delete a theme from the database but not the disk-based version (assuming there is one), the Theme import menu will reappear, as described in condition 1, since that condition is true again.
You can then use the import controls to select the theme and initially import it into the database. In the image above, there is only one theme, ‘Imported Theme’, so it’s already selected. When the Import button is clicked, the theme is added to the themes table.

The theme is now in your themes table to use as desired. If the themes in the table match the themes in your directory, the import control will disappear from the Themes panel again. Poof!
Using imported themes
(forthcoming)
Updating imported themes
If you end up importing more than exporting, you will eventually come to the point where one or more of the themes you have imported need to be updated. This is the case when a theme designer (other than you) has released a newly improved version of a theme you may have already imported once. Not wanting to miss out on the cutting edge or potential security improvements, you dutifully update your version with the latest release.
As with initially importing a theme, you begin by downloading the sourced theme and transferring it to your /themes directory via (S)FTP. Then it is on to the Themes panel where you use the multi-selection controls, again, but this time checking the box on the theme you are updating, then selecting the ‘Update from disk’ option, and leaving the ‘Delete unused templates from database on import?’ option checked.
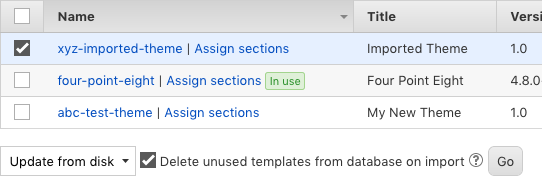
This second option is asking if you want to make your theme in the themes table (database version) the same as the one in the themes directory (disk version) by deleting files that might be different (in terms of existing) in the database version. This is generally a good idea, and presumably why you’re updating the theme to begin with. The box is ticked by default with that in mind, to keep versions consistent. But you might have your reasons for wanting variability, like wanting to customize the database version and keep the original sourced them at hand on disk. Hard to say.
Either way, click the ‘Go’ button and confirm when asked if you are sure.
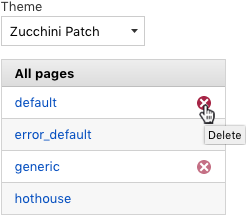
Deleting themes
Themes can be deleted from the themes table (database), and the associated version in the /themes directory (disk) as well, all in one go.
Again, this is done using the multi-selection controls. Check the box for the theme you want to delete from the table, select the ‘Delete’ option from the selection menu, and ensure the option for ‘Delete theme templates from disk too’ is checked.
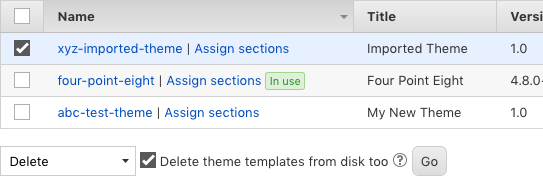
Click Go and confirm when asked.
As a safety precaution, if theme packages on disk contain standard theme directories having non-standard subdirectories (e.g. styles/sass, or JavaScript files, whatever), they will not be deleted by Textpattern; rather, the theme package container will remain, along with the non-standard subdirectories and files inside the directory. This shell of a theme and its non-standard elements will need to be deleted manually from the server since the software does not recognize such elements.
If you choose not to delete the theme from disk (i.e. unchecking the option box), the theme import control discussed in Importing themes appears again at top of the themes table with the theme package still sitting on disk showing in the selection menu. You can then re-import the theme at any time, if necessary, or use the appearance of the theme in the import control as a reminder that the package in the /themes directory also needs to be deleted.